How to Tie Shoelaces Step by Step – A Beginner’s Ultimate Guide
Mastering how to tie shoelaces might seem simple, but mastering the perfect bow takes practice—and a clear, easy method. If you’ve ever stared at two untied laces and wondered, “How do I actually do this?”—this guide is for you. Here, we’ll walk through “how to tie laces step by step” using friendly, straightforward instructions. Whether you’re tying shoes for the first time or teaching a child, these steps will build your confidence and ensure your laces are secure every time.Why Learning to Tie Laces Step by Step Matters
Moving forward, it's essential to keep these visual contexts in mind when discussing How To Tie Laces Step By Step.
Laces are more than just functional—they hold a sneaker, boot, or formal shoe in place and role into style and comfort. But poorly tied laces can bunch, slip, or look messy. That’s where knowing how to tie laces step by step becomes essential. It turns a confusing tangle into a neat knot, making your shoes look professional and your feet feel safe—whether you’re lacing sneakers, boots, or dress shoes.Essential Tools: Just Your Shoelaces and Two Hands

Step-by-Step: How to Tie Shoelaces:**
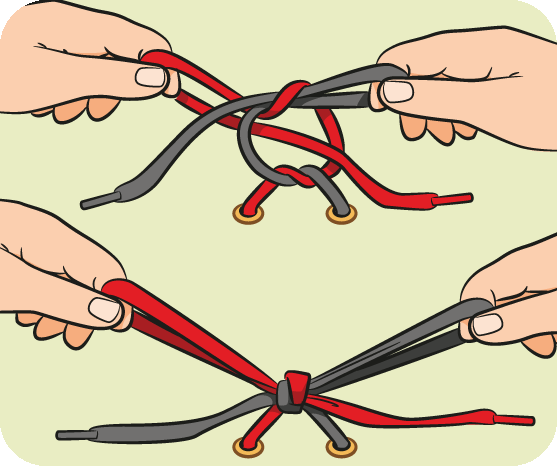
Follow these clear steps every time for a reliable, classroom-tested method:
- Cross the laces: Lay the two center laces flat, parallel to each other. Take the left lace and cross it *over* the right lace, forming an “X.” This simple crossover starts your knot and sets the foundation for a tight bow.
- Form the first loop: Bring the left lace behind the right, under the loop you just created, then pull it through. This loop holds the tension and shapes your bow base.
- Make the second pass: Now cross the right lace over the left (retracing the first pass) and thread it underneath the left lace from front to back. This captive move creates structured tension.
- Wrap and tension: Bring the right lace behind the left again and slide it through the small loop you formed at the back. At this point, gently pull both laces to tighten the knot—snug but not too tight, allowing breathing room for your foot.
- Secure the final loop: Once both lace ends hang evenly, center the base loop between your thumbs. Use your fingers to hold and gently tighten the loops. Adjust until the knot lies flat and elegant—this is how to tie laces step by step for a bow that stays put.
Troubleshooting Common Issues when How to Tie Laces Step by Step
Even with clear steps, laces sometimes slip or tighten unevenly. Here’s how to fix common pitfalls:
- If loops look lopsided, gently re-center them before tightening.
- If the knot feels loose, rerun one loop through the tunnel first.
- For extra grip, slightly cross the laces tighter before final knotting.
Simple Alternatives in “How to Tie Shoelaces”
While the classic crossover knot is reliable, there are shortcuts depending on your shoe type:
- **Bunny Ears:** Great for quick ties, pinch each lace between thumb and forefinger to form “ears” before crossing and knotting.
- **X-Knot:** Cross laces in an X shape *twice* before wrapping for a stronger hold—ideal for sneakers that rub or bend.
- **Loop & Pull:** Pull one lace through the loop quickly—best for low-tension needs or kids learning.
But no matter the method, mastering “how to tie laces step by step” builds hand control and confidence.
Why Consistent Practice Makes a Difference
Like any skill, tying laces improves with repetition. Practice daily with a trusted shoe—whether white sneakers, leather boots, or kids’ shoes—and soon your hands will move almost automatically. Remember, a neat bow isn’t just about looks; it’s about function. Secure laces mean no snagging, better grip, and shoes that fit just right all day.
Visual Reminder: How to Tie Shoelaces Step by Step
Picture this: two laces crossed, loops formed, tension pulled tight, a clean bow secured. That’s the goal of “how to tie laces step by step.” Use diagrams before and after each phase, tape early practice tries on shoes, or follow short video demos—visual guides reinforce muscle memory and perfect technique.
Final Thoughts: Your Shoe, Your Knot, Your Confidence
Learning how to tie laces step by step is more than a chore—it’s a small victory with big payoff. These five simple, repeatable steps empower you to own your footwear style, stay neatly dressed, and tackle any shoe like a pro. So next time your laces loosen, pause, take a breath, and trust your method. Because every time you tie, you’re tying not just laces—but confidence.
Let this guide be your roadmap—step by step, lace by lace—until perfect lacing becomes second nature. Happy lacing!

Such details provide a deeper understanding and appreciation for How To Tie Laces Step By Step.


")
")
")
 - wikiHow")