How to Tie Shoe Laces for Athletes: The Ultimate Guide
Tying your shoe lace properly isn’t just about aesthetics—it’s a critical skill for athletes who demand precision, support, and comfort during peak performance. Whether you’re sprinting, shooting, or playing hard on the field, knowing how to tie shoe laces for athletes can dramatically reduce blisters, improve stability, and maximize your on-field control. In this comprehensive guide, we’ll break down the most effective techniques, share pro tips, and reveal sport-specific lacing hacks—all to help you tie those laces like a champion. If you’re asking, “how to tie shoe laces for athletes,” you’re already ahead: securing your footwear properly is one of the simplest yet most impactful ways to enhance your athletic performance. This guide addresses every angle—from basic knotting to advanced lacing patterns tailored for evolving footwork and diverse sports needs.The Core of Athletic Performance: A Secure Fit
Before diving into techniques, understand the goal: your shoe lace should hold firm without strangling circulation or restricting movement. For athletes, a well-tied lace prevents slippage during explosive movements, enhances ankle support, and maintains consistent pressure along the midfoot and upper. Start simple—begin and end at the eyelets closest to your toes, then crisscross with deliberate tension.Combining consistency with customization is key. While standard lacing secures the top, athletes often need more—extra tightness, variable patterns, or specialized systems to match their foot shape and sport demands. This is where the answer to "how to tie shoe laces for athletes" truly evolves beyond the basics.
Mastering the Standard Lacing Technique
The classic criss-cross method remains a gold standard. Begin by threading one lace through the bottom eyelet. Loop it up past the top eyelet, then feed it under toward the next, repeating the crisscross pattern until you reach the top. Pull tight, ensuring loops are symmetrical and snug but comfortable. Secure with a double knot tied in a small or medical knot formation to resist loosening under stress.This technique forms the backbone of most athlete lacing strategies. The equal tension across both sides stabilizes your foot, reduces toe pressure, and optimizes shock absorption—critical for endurance and agility. If done correctly, none of your laces slip during your fastest sprints.

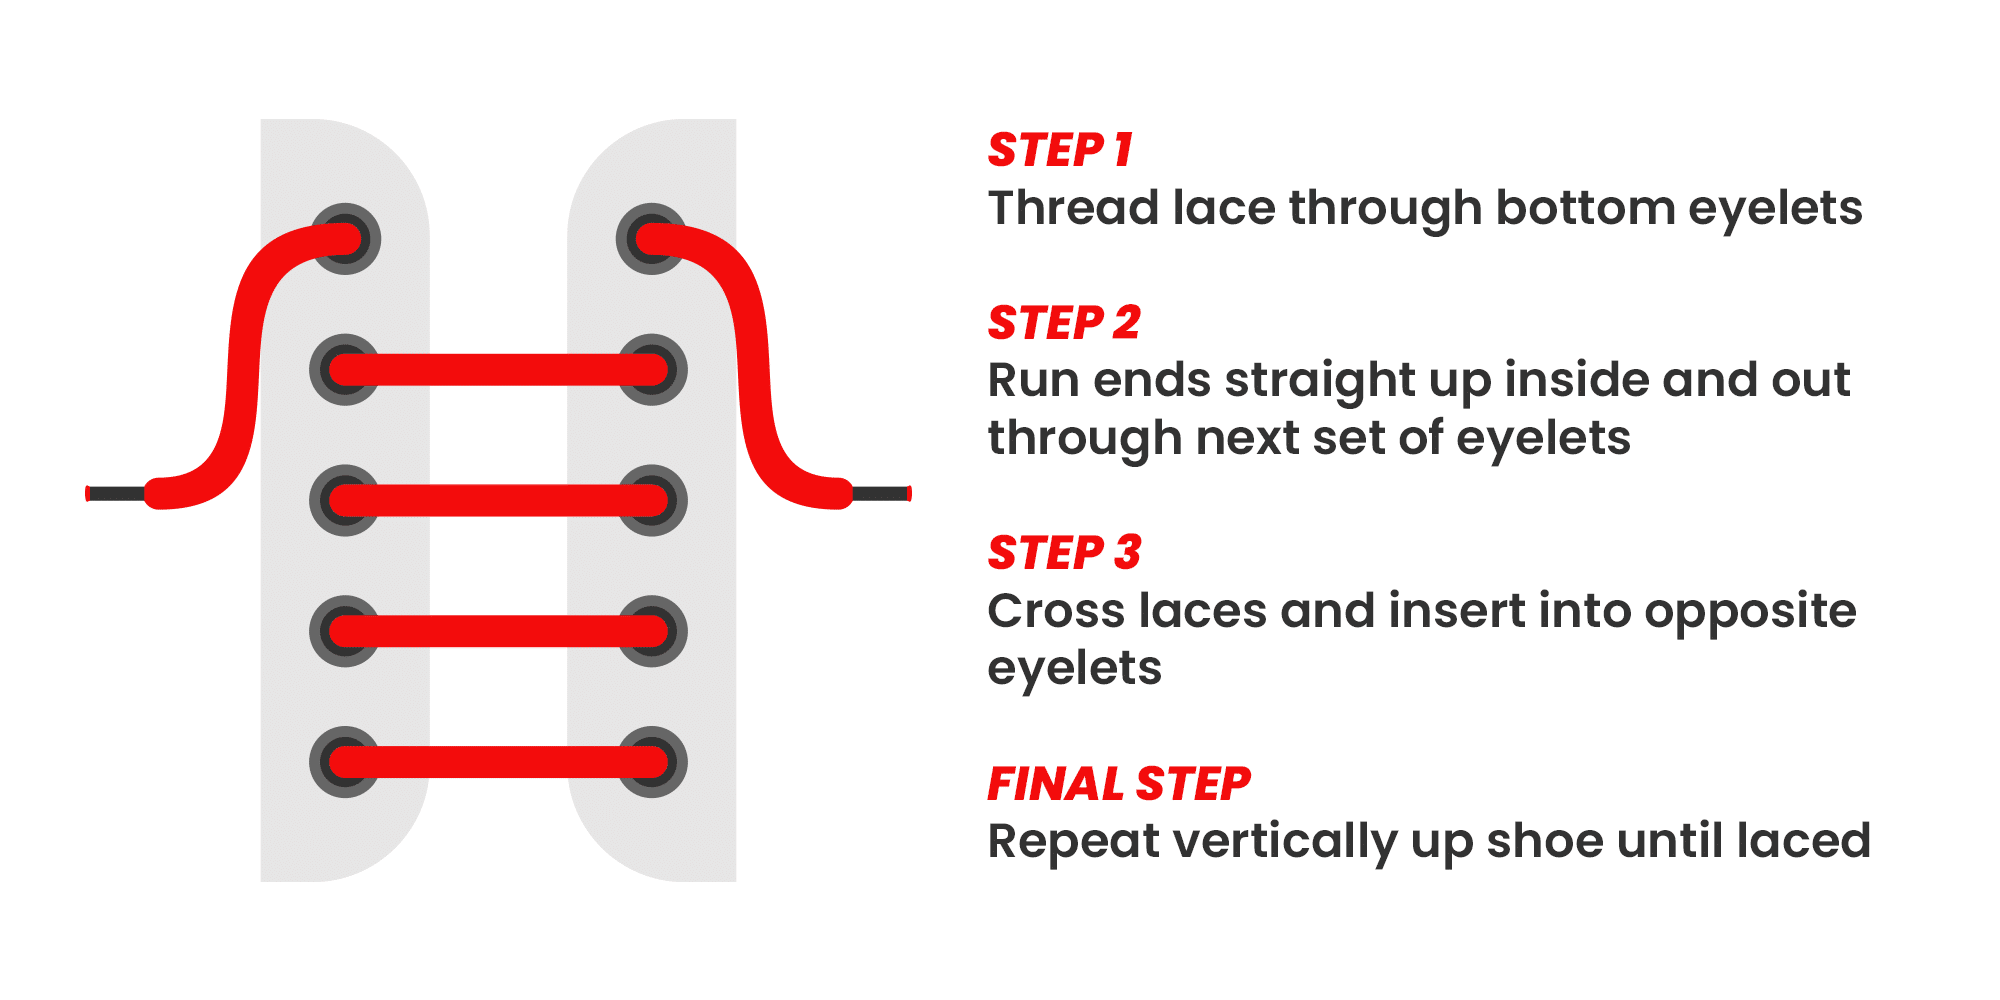
Moving forward, it's essential to keep these visual contexts in mind when discussing How To Tie Shoe Laces For Athletes.
Advanced Techniques for Elite Athletes
For those asking, “how to tie shoe laces for athletes” with specific goals—like enhanced support, faster adjustment, or reduced friction—explore these sport-tailored options: These methods fine-tune performance, especially in high-impact or repetitive motions where lace slippage can lead to performance drops or injury.Fixing Lacing Issues Common Among Athletes
Even seasoned athletes struggle with lacing challenges. Here’s how to pinpoint and fix the most frequent problems:- Loose, Slipping Laces: This often stems from uneven tying or worn-out eyelets. Reinforce eyelets with protective sleeves or switch to thicker no-d died lace cords for better grip.
- Tight, Restricted Fit: Over-tight knotting compresses the foot—balance compression with flexibility. Try a 3-step finish-knotting approach to reduce tension while preserving stability.
- Uneven Loops: Asymmetrical loops cause imbalance and blisters. Always check symmetry when tying; use your non-dominant hand for visual and tactile feedback.
The Lace vs. No Tie Debate
Tips Tailored to Every Athlete’s Foot
No single lacing works for all. Customize based on foot type and sport:- Wide Feet: Opt for wider-scale laces or multiple evenly spaced criss-cross loops to prevent pressure points.
- High Arches: A focus on flexibility with fewer crossing points avoids strain, maintaining cushion without sacrificing support.
- Tight Heels: Use lace tuning systems or reinforced aglets to help lock heel counters tightly, reducing blisters.
Final Proven Steps: How to Tie Shoe Laces Like an Athletic Pro
Follow these simple steps—repeat them daily until muscle memory kicks in:- Thread beginnings from bottom eyelet closest to your toes, ensuring equal double lengths on each side.
- Use a criss-cross pattern, crossing laces top-down across the shoe’s interior, tightening carefully with each pass.
- Once at the top, gather lace ends neatly—avoid twists—and wrap securely in a double knot or medical knot.
- Perform a tug test: gently pull both loops perpendicular to check symmetry—adjust loops until they lie flat and even.
- Secure with a quick-release toggle or insect-repellent lacets if used—designed for rapid release and durability.

")


