Beginner’s Guide to Pre-Shaping Dough Texture
If you’re new to bread baking, one of the most critical yet often intimidating steps is learning how to pre-shape your dough texture. This foundational step plays a surprising role in determining the final structure, rise, and appearance of your loaf. Whether you're making a hearty sourdough boule or a crisp baguette, understanding and mastering pre-shaping can transform your baking journey. In this beginner’s guide to pre-shaping dough texture, we’ll break down what it is, why it matters, and how to do it right—so you can bake with confidence. Pre-shaping is the intentional process of dividing, shaping loosely, and gently resting your dough before its final shaping. It’s far from finished shaping but more than just mixing—and it sets the foundation for a strong gluten network, even air distribution, and a smoother final product. Think of it as a warm-up exercise for your dough: it allows the gluten strands to organize, surface tension to develop, and air pockets to distribute evenly. These small actions lead to better oven spring, a more uniform crumb, and a loaf that rises beautifully in the oven.Why Pre-Shaping Is Essential for Beginners
For new bakers, raw, unmodified dough often feels slack, sticky, and hard to handle. Without pre-shaping, folding or shaping can cause columns to collapse, air bubbles to get trapped unevenly, and the final loaf to lose structure. Pre-shaping solves these problems naturally:- Strengthens Gluten: Gentle stretching and folding build gluten strength without overworking the dough, making it elastic and resilient.
- Improves Air Distribution: By folding and pressing seeds or other additives into the surface, you ensure air moves smoothly through the dough, promoting even fermentation and rise.
- Reduces Sticking: A gentle rest and controlled handling help prevent the dough from clumping, making final shaping easier and cleaner.
- Enhances Surface Tension: Light surface tension allows the dough to hold its shape better once shaped—key to an attractive, evenly risen loaf.
Furthermore, visual representations like the one above help us fully grasp the concept of Beginner’S Guide To Pre-Shaping Dough Texture.
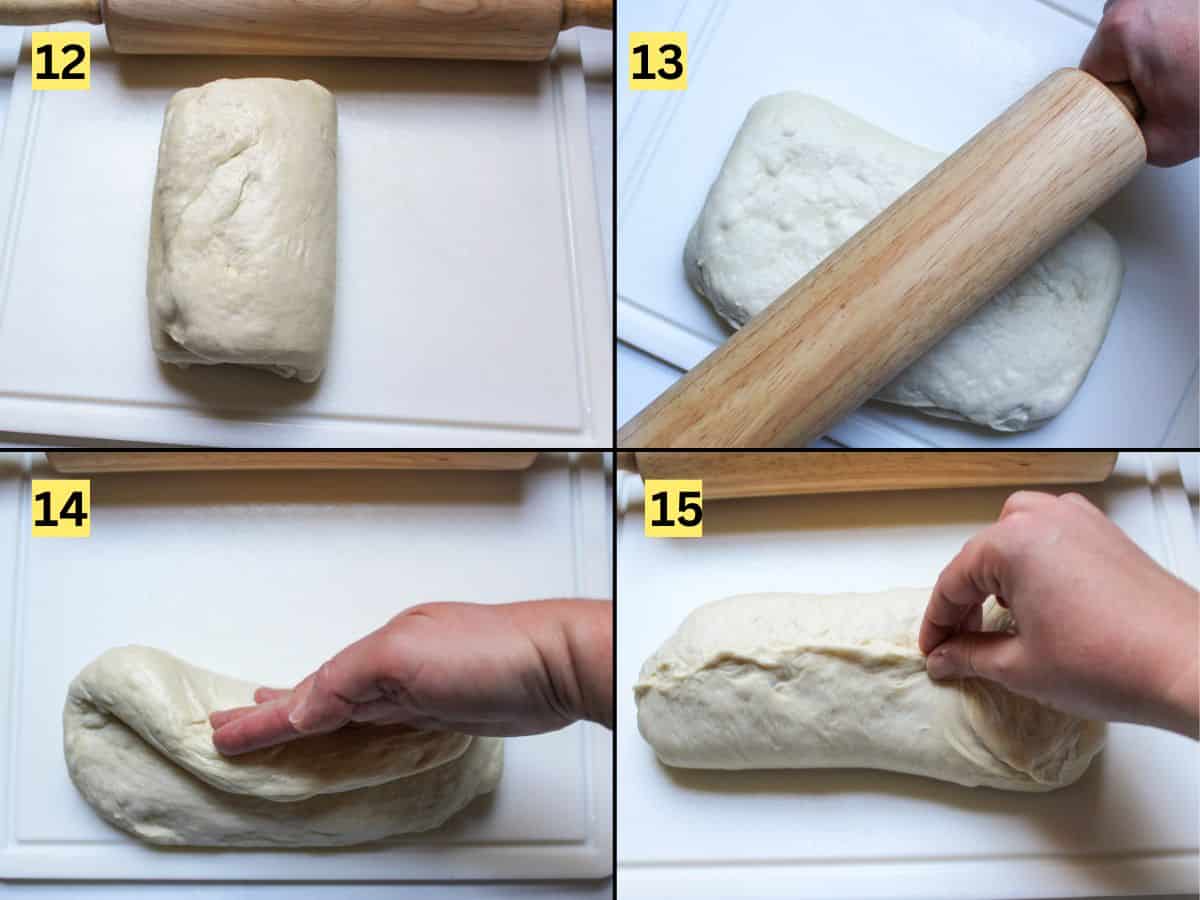
Step-by-Step: How to Pre-Shape Dough Texture
Getting your dough ready starts with three simple actions: dividing, gently shaping, and resting. Here’s how to do it like a pro:- Divide Carefully: Split your bulk dough into even-sized pieces based on your desired final loaf size. Use a damp knife or bench scraper; damp surfaces prevent sticking. For sourdough, aim for roughly 250–350g per portion, depending on your recipe.
- Shape Loosely: Take one piece and fold it gently by tucking small wings into the surface. This doesn’t need to be tight—leave room for gluten to relax and expand later. Avoid over-firm pressing; the dough should still feel supple and slightly sticky.
- Rest Briefly: Place shaped portions seam-side up in a floured banneton (banneton is a woven basket that supports rising). Let them rest for 20–30 minutes at room temperature. This rest helps the gluten relax, making final shaping easier and less messy.

Common Mistakes to Avoid
Beginners often make a couple of pitfalls when practicing pre-shaping: Always keep hands and tools damp, and work quickly but gently. If your dough feels sticky, a light sprinkle of flour (not too much!) can help handle it without stripping strength.Connecting Pre-Shaping to Final Success
:max_bytes(150000):strip_icc()/__opt__aboutcom__coeus__resources__content_migration__serious_eats__seriouseats.com__2014__08__20140828-bread-dough-second-folding-collage-33974ca583694f32928c821a746730ce.jpg)
Moving forward, it's essential to keep these visual contexts in mind when discussing Beginner’S Guide To Pre-Shaping Dough Texture.
Imagine your dough as a skeleton preparing for its first full-body form. Pre-shaping primes that structure—strengthens bones, aligns muscle fibers, and sets rhythm to breath (or rise). When shaped correctly in the final step, you’ll see how effortless it expands under heat: a tight, even crust forms, gases escape smoothly, and the loaf rises to full golden glory. For beginners, this step is the secret ingredient between average bread and truly excellent sourdough or artisan loaves.

 - The Perfect Loaf")


:max_bytes(150000):strip_icc()/how-to-form-a-loaf-427573-step-04-1-fbb34c4bdb2b4ce0a5aba9ecd4d64dcb.jpg "How To Divide and Preshape Sourdough Dough - sourdoughtalk.com")


")