Configuring iVLAN on Router: A Comprehensive Guide
Inter-VLAN (iVLAN) routing is a network configuration technique that allows communication between devices on different VLANs (Virtual Local Area Networks) within the same network. In this article, we will explore the step-by-step process of configuring iVLAN on a router, along with the benefits and common challenges associated with this setup.Benefits of Inter-VLAN Routing

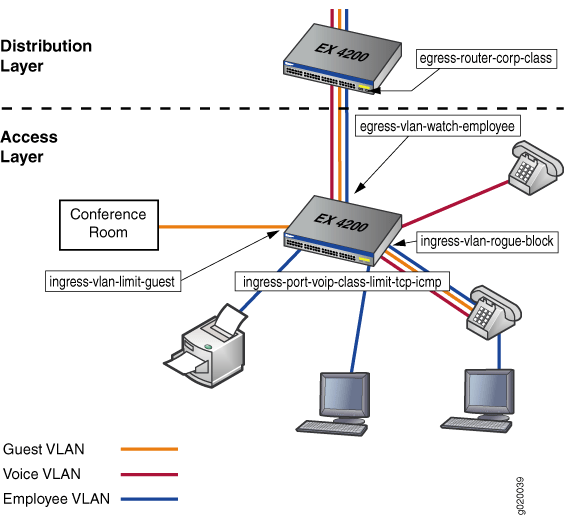
This particular example perfectly highlights why Configuring Ivlan On Router is so captivating.
Configuring iVLAN on a router provides several benefits, including: * Improved network security: By segmenting network traffic, iVLAN routing enhances security by limiting the spread of malicious activity. * Enhanced performance: iVLAN routing allows for optimized network traffic management, resulting in improved performance and reduced latency. * Scalability: iVLAN routing enables the easy addition of new VLANs and devices, making it an ideal solution for large-scale networks.Pre-requisites for Configuring iVLAN on Router
Step-by-Step Configuration Guide
Moving forward, it's essential to keep these visual contexts in mind when discussing Configuring Ivlan On Router.
To configure iVLAN on a router, follow these steps: 1. **Enter Global Configuration Mode**: `Router# configure terminal` 2. **Enable VLAN Routing**: `Router(config)# vlan routing` 3. **Define VLAN Routers**: `Router(config)# ip address `VLAN-router-name` `IP-address` 4. **Configure VLAN Interface**: `Router(config)# interface VLAN `X`` 5. **Assign VLAN**: `Router(config-if)# switchport access vlan `X`` 6. **Save the Configuration**: `Router(config-if)# copy running-config startup-config` - Ubiquiti Help Center")


![View of [Wireless Router] What is VLAN and how to setup in ASUS Wireless Router?](https://www.cisco.com/c/dam/en/us/support/docs/smb/routers/cisco-rv-series-small-business-routers/images/Configuring_VLAN_Settings_on_the_RV160_and_RV260_image001.jpg "[Wireless Router] What is VLAN and how to setup in ASUS Wireless Router?")


 - GeeksforGeeks")


